Some links on this site are affiliate links. If you book through one, Tokyo Trailhead earns a commission at no extra cost to you. It never decides what appears here.
Mount Takao does not need a bus. That is part of why so many visitors go there first, whether they know it or not.
Most of the other mountains within reach of Tokyo do need one. The train gets you to a valley station, and then there is one more vehicle to take before you reach the trailhead, and it is usually a local bus.
That bus is where people stop planning. Not because it is difficult, but because it does not work the way the buses in central Tokyo work. The door you get on by is different. The moment you pay is different. There is a paper ticket involved that does not exist in the city, and a screen at the front covered in numbers.
All of it comes from one thing, and once you know what that one thing is, the rest of the bus explains itself.
On the way to Mount Mitake in August 2026 we rode two of these buses, one at each end of the day. What follows is what is actually written on them, in photographs, with the fares we actually paid.
What this guide covers12 sections
- The one fact everything comes from
- Getting on, in six steps
- The fare box gives no change
- If it goes wrong
- The IC card rule is one line long
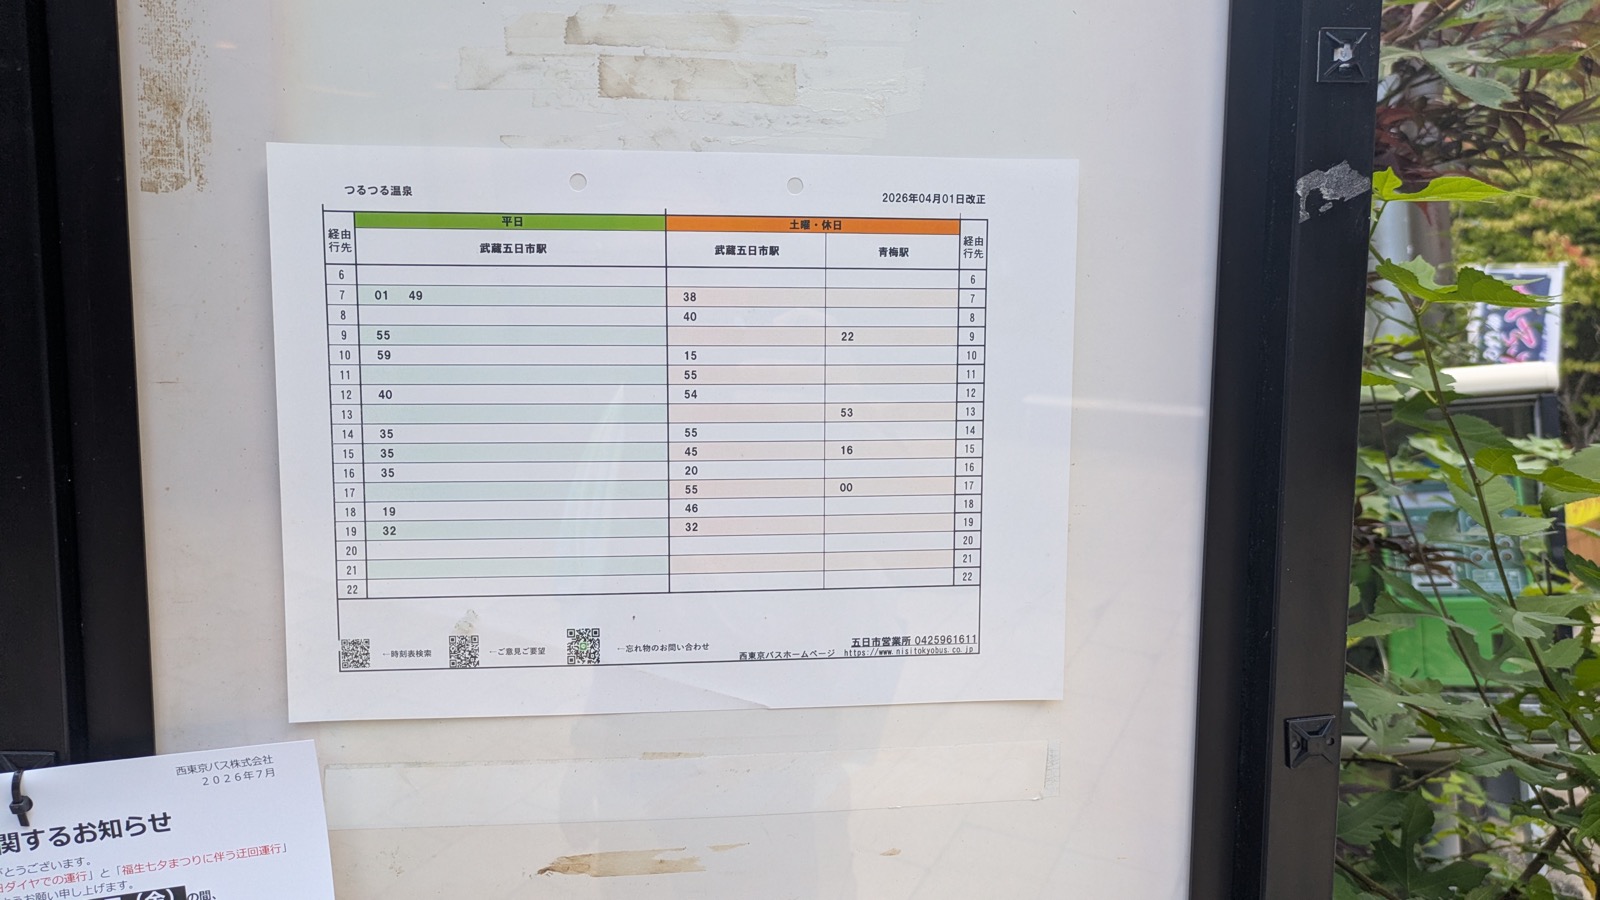
- How to read the timetable on the pole
- Look at the bus home before you go up
- Finding the stop
- What is in English, and what is not
- Does the mountain you picked need a bus at all?
- Questions people actually ask
- Related
The one fact everything comes from
In central Tokyo the fare is flat. A Toei bus costs the same 210 yen whether you ride two stops or twenty, so the company can take your money the moment you step on, at the front door, without knowing where you are going.
Outside the city the fare is not flat. It depends on where you got on. The company cannot charge you until it knows that, which means you pay at the end, and it means the bus needs a way of remembering where each passenger boarded.
Everything strange about a country bus follows from that single sentence.
| Central Tokyo | Trailhead bus | |
|---|---|---|
| Which door | Front | Middle |
| When you pay | On boarding | On getting off |
| Fare | Flat, 210 yen on a Toei bus | Depends on where you got on |
| Paper ticket | None | A numbered ticket, which is the memory |
| Display at the front | Not needed | Shows the price for each number |
The numbered ticket is called a seiriken. It is not a receipt, it is not a transfer, it is not something you need to keep for the rest of the day. It is a note to the fare box saying which stop you got on at. You hand it over when you leave.
And here is the useful part. An IC card removes every row of that table. Touch on, touch off, and the machine does the remembering. If you are carrying Suica, PASMO, or one of the other cards, most of this article becomes background reading.
Affiliate link. This site earns a commission if you book through it, at no extra cost to you. Photo from our own walk.
Getting on, in six steps
1. Get on through the middle door.
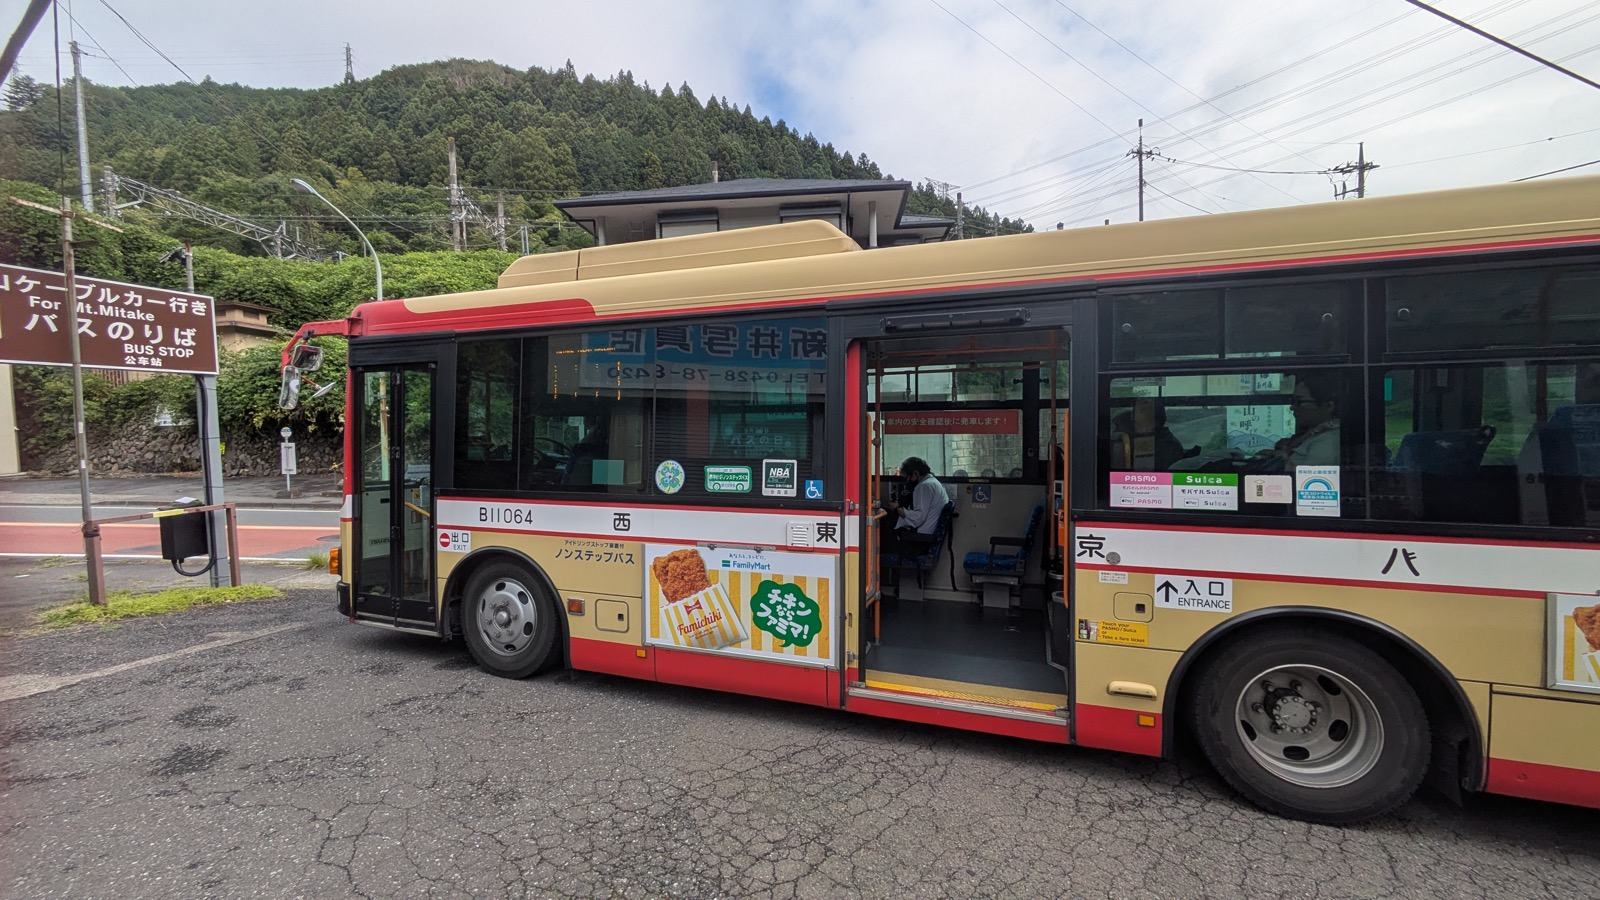
The middle door is the entrance. It is marked 入口 with ENTRANCE printed underneath. The front door, beside the driver, is the exit, marked 出口 with EXIT. This is the exact reverse of the city, and it is the step people get wrong.
2. Take a numbered ticket, or touch your card.
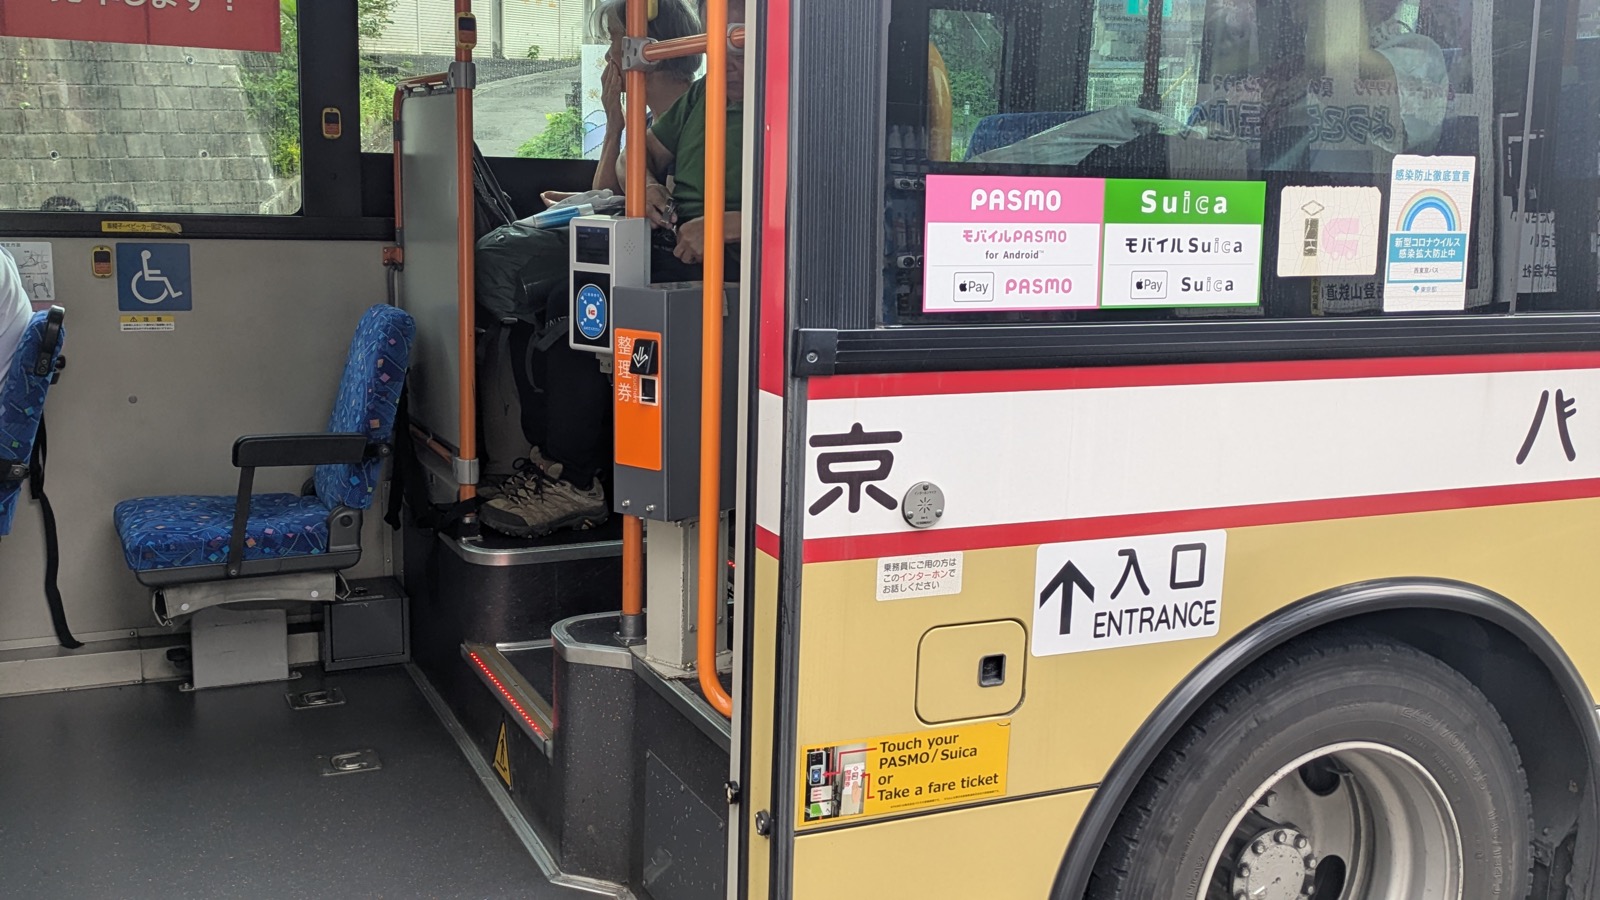
Just inside the middle door there is a post with two things on it: a small orange machine that prints the numbered ticket, and a card reader on top. You use one of them, not both.
On the bus to Mount Mitake there is a yellow label on the bodywork beside the door, in English, telling you to touch your card or take a ticket. Stickers on the window show which cards are accepted, including the mobile versions on a phone.
3. Sit down. Nothing else is required of you.
You do not tell the driver where you are going. You do not show anything. Nobody will come round to check.
4. Watch the display when you want to know the price.
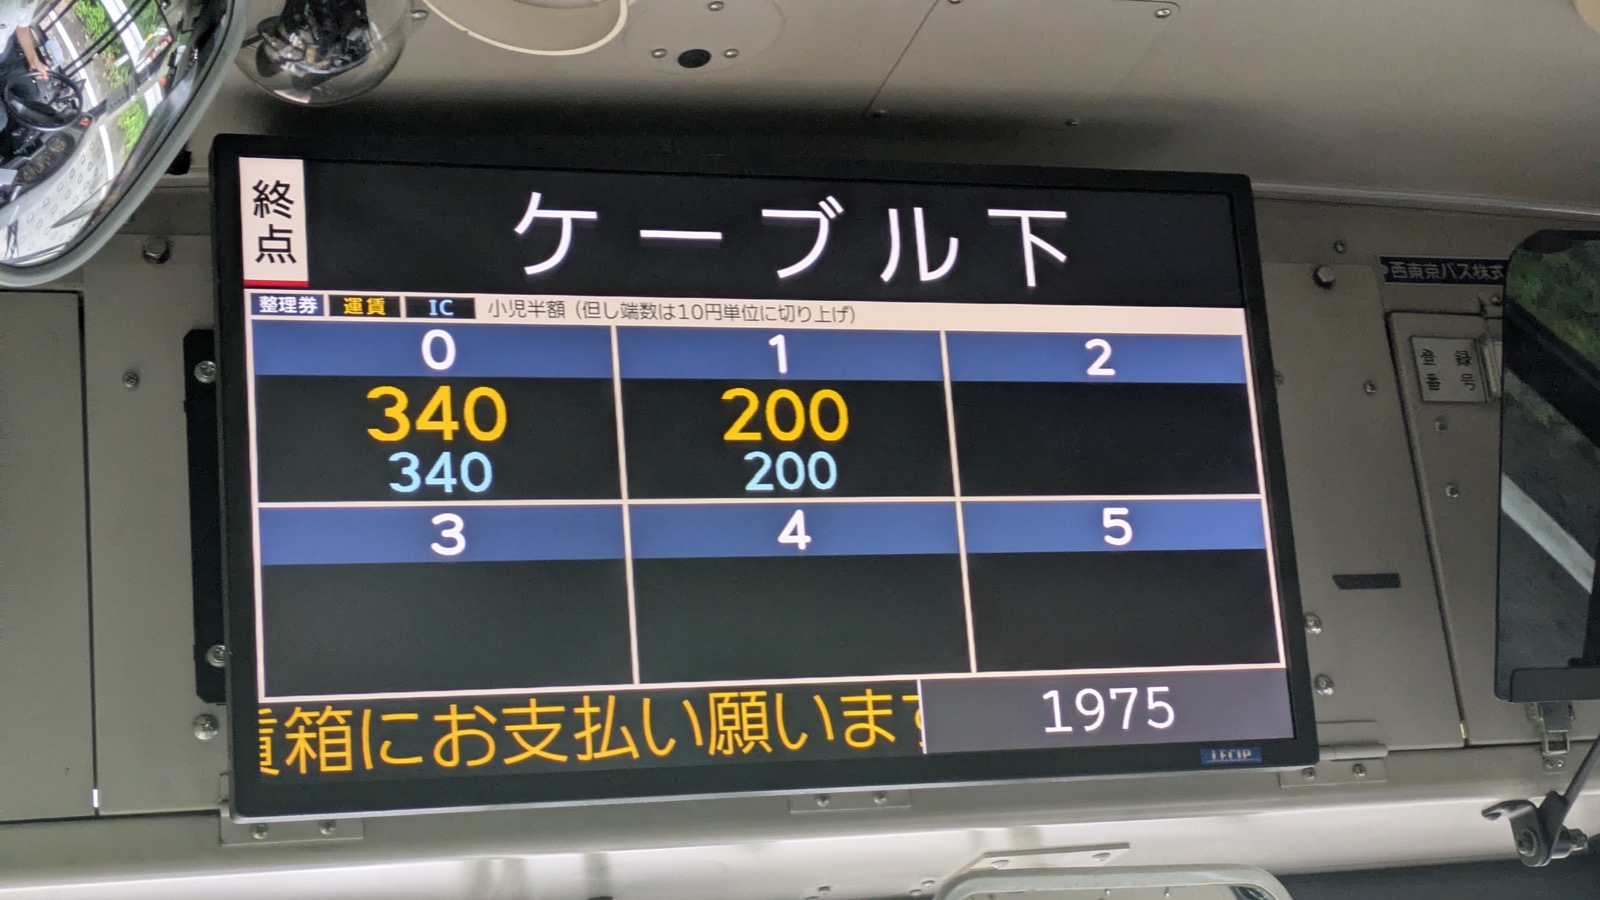
The screen at the front shows the destination across the top, then a grid of numbers with a price under each one. Find your ticket number, read the price under it, and that is your fare.
On the 07:56 from Mitake Station the ticket said 0, because the station is the first stop on the route, and under the 0 the display said 340. One other number was showing at that moment, number 1 at 200 yen.
Worth knowing: the number is not a stop, it is a fare stage. There are several stops on the way from the station up to the cable car, but they do not each get their own number. Everybody who boards at the station holds a 0, whatever happens after that.
The number under your ticket goes up as the bus travels. That is not a fault, it is the fare being calculated in front of you, and it stops going up when you get off. If you board at the first stop of a short route, as almost everybody heading for a trailhead does, it reaches the full fare early and sits there. Which is why you can ignore the display entirely and simply read it once, at the end, when the bus has stopped.
5. Press the yellow button, unless the bus is going to the end.
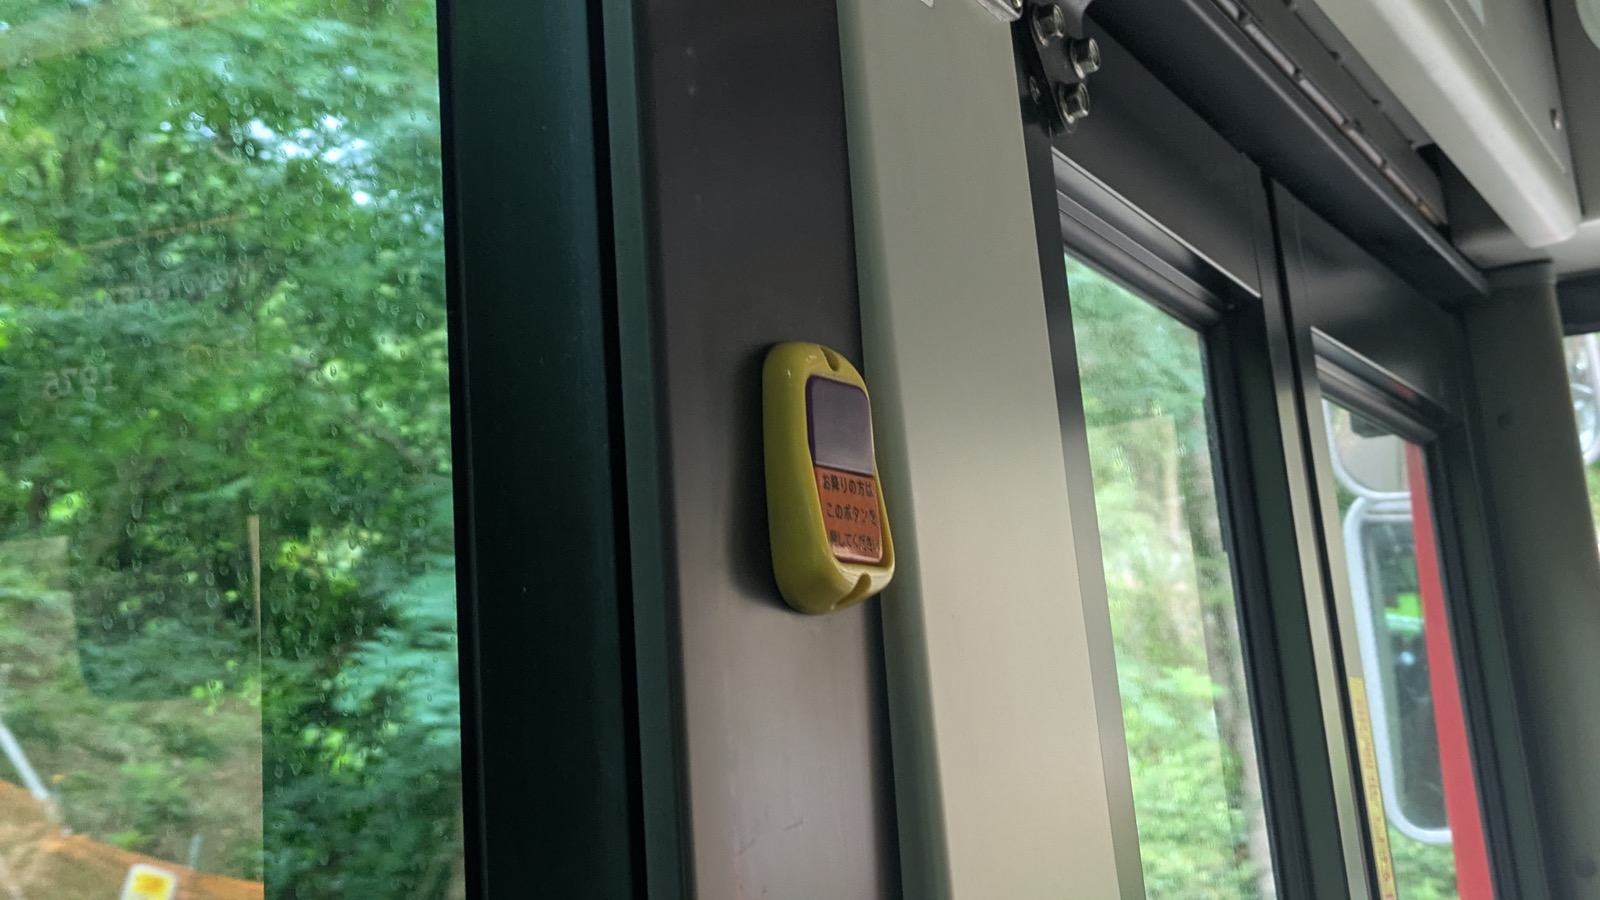
The stop buttons are on the window pillars, yellow, one every metre or so. Press one after the stop you want has been announced. The button on this bus has a small red label in Japanese on it and no English at all, which does not matter, because it is the only yellow button on the wall.
If your stop is the terminus, you do not need it. On both buses we took, the trailhead was the last stop, so the driver emptied the bus without anybody pressing anything.
6. Pay at the front as you get off.
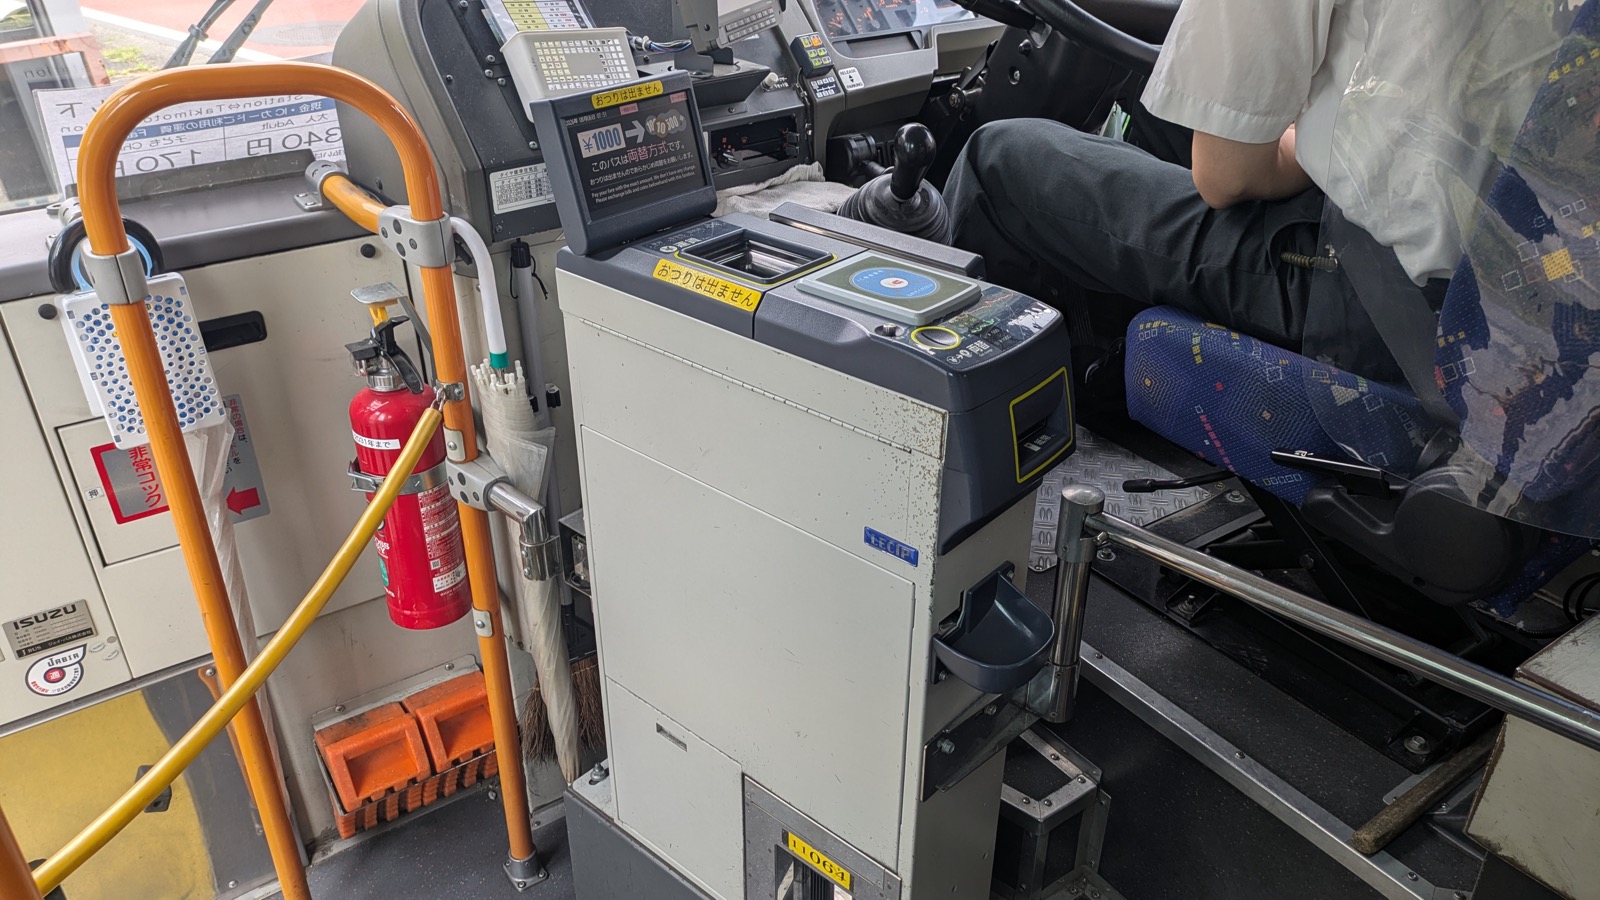
Walk to the front door. Drop the numbered ticket into the fare box beside the driver, then the coins. If you are using a card, touch it on the reader on top of the box instead. Then get off.
On the Mount Mitake bus the fare was 340 yen for adults in cash, and 340 yen by card. That is worth noticing: in central Tokyo the IC fare is a few yen cheaper than the cash fare, on this route they are identical.
The fare box gives no change
This is the one that traps people, and it has nothing to do with language.
The fare box does not give change. Put in 500 yen for a 340 yen fare and you have paid 500 yen.
What it does instead is change money for you, before you pay. There is a slot that takes a 1,000 yen note and returns the value in coins, and then you pay the fare out of those coins. A label on the machine on the Mount Mitake bus shows this as a picture, with 1,000 yen going in and coins coming out.
Assume that a 1,000 yen note is the largest thing it will deal with. Do not board with a 5,000 or a 10,000 yen note as your plan.
So the practical rule for a day in the mountains is this. Break your large notes before you leave the city, or put money on an IC card in advance. A convenience store near the station will break a note for you in the course of buying something, and a station ticket machine will top up a card in about fifteen seconds.
Do one of those two things at home, in daylight, with nobody waiting behind you. It is the entire difference between a bus that takes four seconds to pay for at the end of a long day, plus a bus that does not.
If it goes wrong
None of this is a test, and the driver has done it before with passengers who speak no Japanese at all. The transaction is mechanical, and it is designed to be finished in a few seconds by somebody who is not thinking about it.
If you sat down without taking a numbered ticket, say the name of the stop where you got on when you reach the front. On a route where almost everybody boards at the station, the answer is obvious anyway.
If your card turns out to be short of money, there is no way to add any on board, so expect to settle in cash. That is the real argument for carrying coins even when you intend to pay by card.
If you are not sure the bus is yours, ask before you get on rather than after. The destination on the front of the bus is the same text as the heading on the timetable, so pointing at one while looking at the other works without a word of Japanese.
There is only one way to genuinely hold a bus up, and it is not any of the above. It is starting to look for your money after the bus has stopped. Get the ticket in one hand and the coins in the other while you are still moving, and you will be off the bus before anybody has looked at you.
The IC card rule is one line long
Touch when you get on. Touch when you get off.
That is the whole thing, and the reason it matters is that the second touch is what tells the machine how far you went. Touch only once and the fare cannot be calculated, which turns a two second transaction into a conversation with the driver.
Suica, PASMO, and the other transport cards are the same card for this purpose. The buses to Mount Mitake take the mobile versions on a phone as well.
Two limits are worth knowing before you rely on a card.
There is no top-up machine on a bus. Add money at a station or a convenience store before you leave the city. The bottom station of the Mount Mitake cable car happens to have a top-up machine on the wall, which is unusually helpful, and you should not plan on finding one.
Not every rural operator accepts them. The two we rode did. If your mountain is served by a small local company, check its website before you decide to travel without cash.
How to read the timetable on the pole
Every bus timetable we photographed on this trip used the same layout, and once you can read one you can read all of them.
- The stop name is in the top left corner.
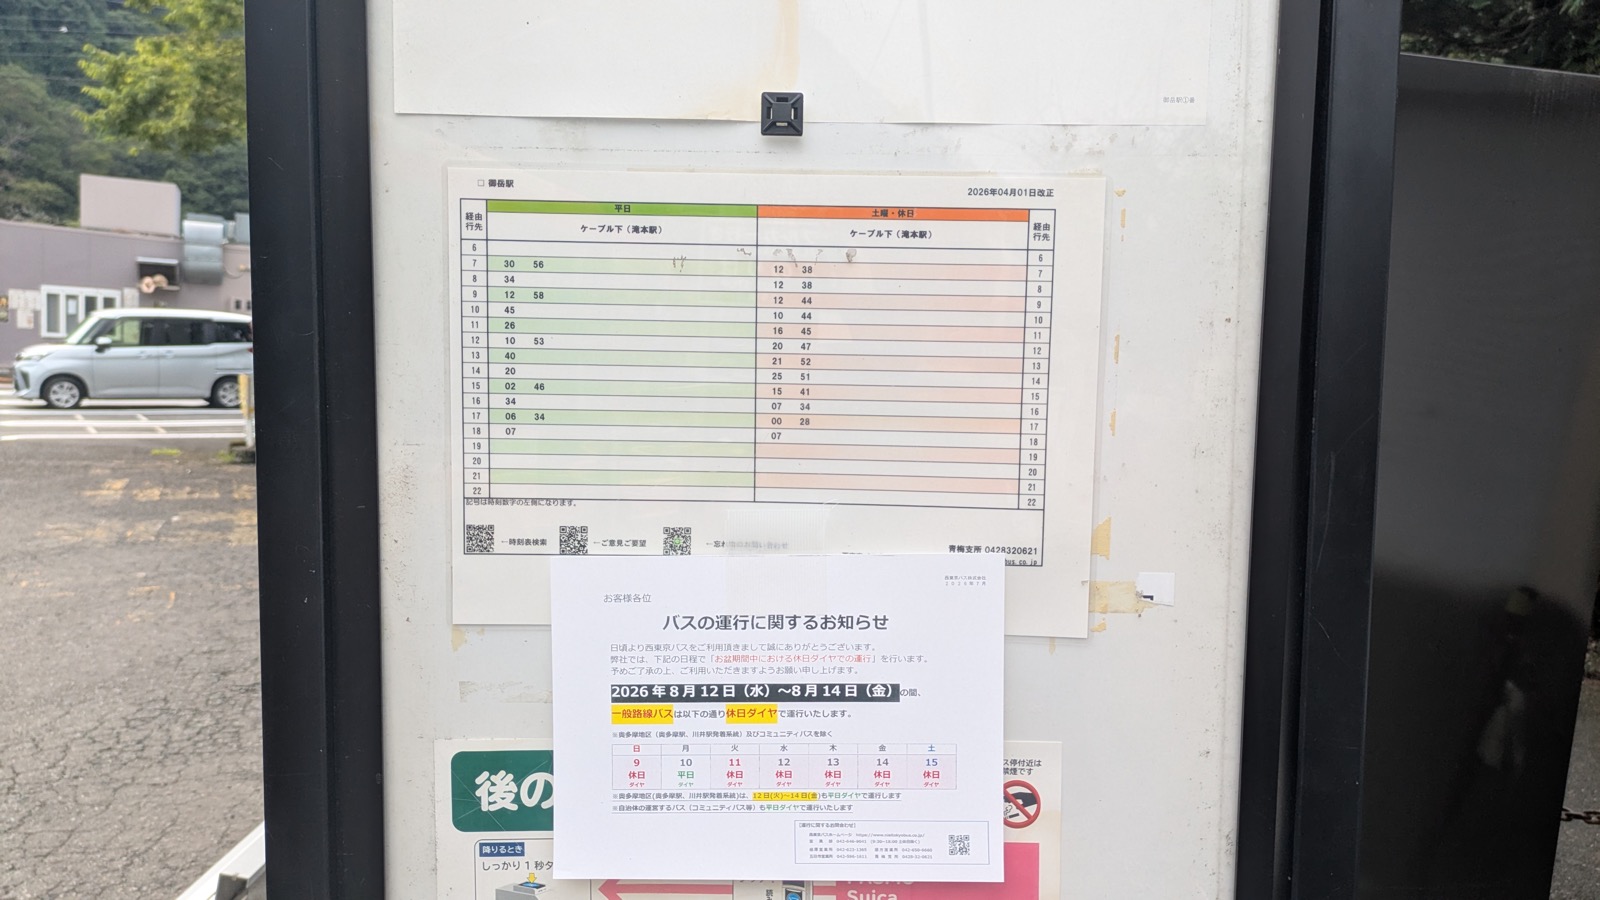
- The revision date is in the top right. Both of ours read 1 April 2026. A timetable with an old date on it is the wrong timetable.
- The left half is weekdays, printed on green.
- The right half is Saturdays, Sundays, and holidays, printed on orange.
- The hour runs down the columns at both edges, from 6 in the morning to 22 at night. The numbers inside are the minutes.
Two traps live inside that layout.
The weekend half can split into more than one destination. The timetable at the hot spring below Mount Hinode has one column on weekdays, for Musashi-Itsukaichi Station, and two columns at weekends, because on Saturdays, Sundays, and holidays some buses go to Ome Station instead. Same stop, same pole, two different railway lines. On a weekday the second option does not exist at all.
Holiday timetables spread onto weekdays. A notice taped under the timetable said that during Obon, 12 to 14 August 2026, the weekday services would run to the holiday schedule. In mid August the calendar on your phone is not the calendar the bus is using.
Look at the bus home before you go up
This is the part that actually changes a day in the mountains, and it is not about how to pay for anything.
Mountain buses are frequent in the morning, because everybody is going up, and they thin out in the middle of the day, because nobody is. The gap always lands in the early afternoon, which is exactly when you come down.
Two measured examples from the same day.
- At Cable-shita, the stop below Mount Mitake, the weekday buses back to the station leave at 13:10 and then 14:37. That is an 87 minute hole.
- At the hot spring below Mount Hinode, the weekday buses leave at 12:40 and then 14:35. That is 115 minutes, and we sat inside it. Arriving at 13:12 meant a bus at 14:35, which turned into a bath, lunch, and a wait that was entirely comfortable because it had been read off the timetable in advance.
The habit worth building is this. Photograph the return timetable before you start walking. Not after. Phone signal on a mountain is not reliable, the timetable is on a pole at the stop where the bus dropped you, and thirty seconds there saves you from doing arithmetic on a summit.
Then pick your target bus, and treat everything above it as optional. This is the same idea as buying a single ticket instead of a return: you are keeping the day open on purpose, but you are keeping it open against a known deadline.
Finding the stop
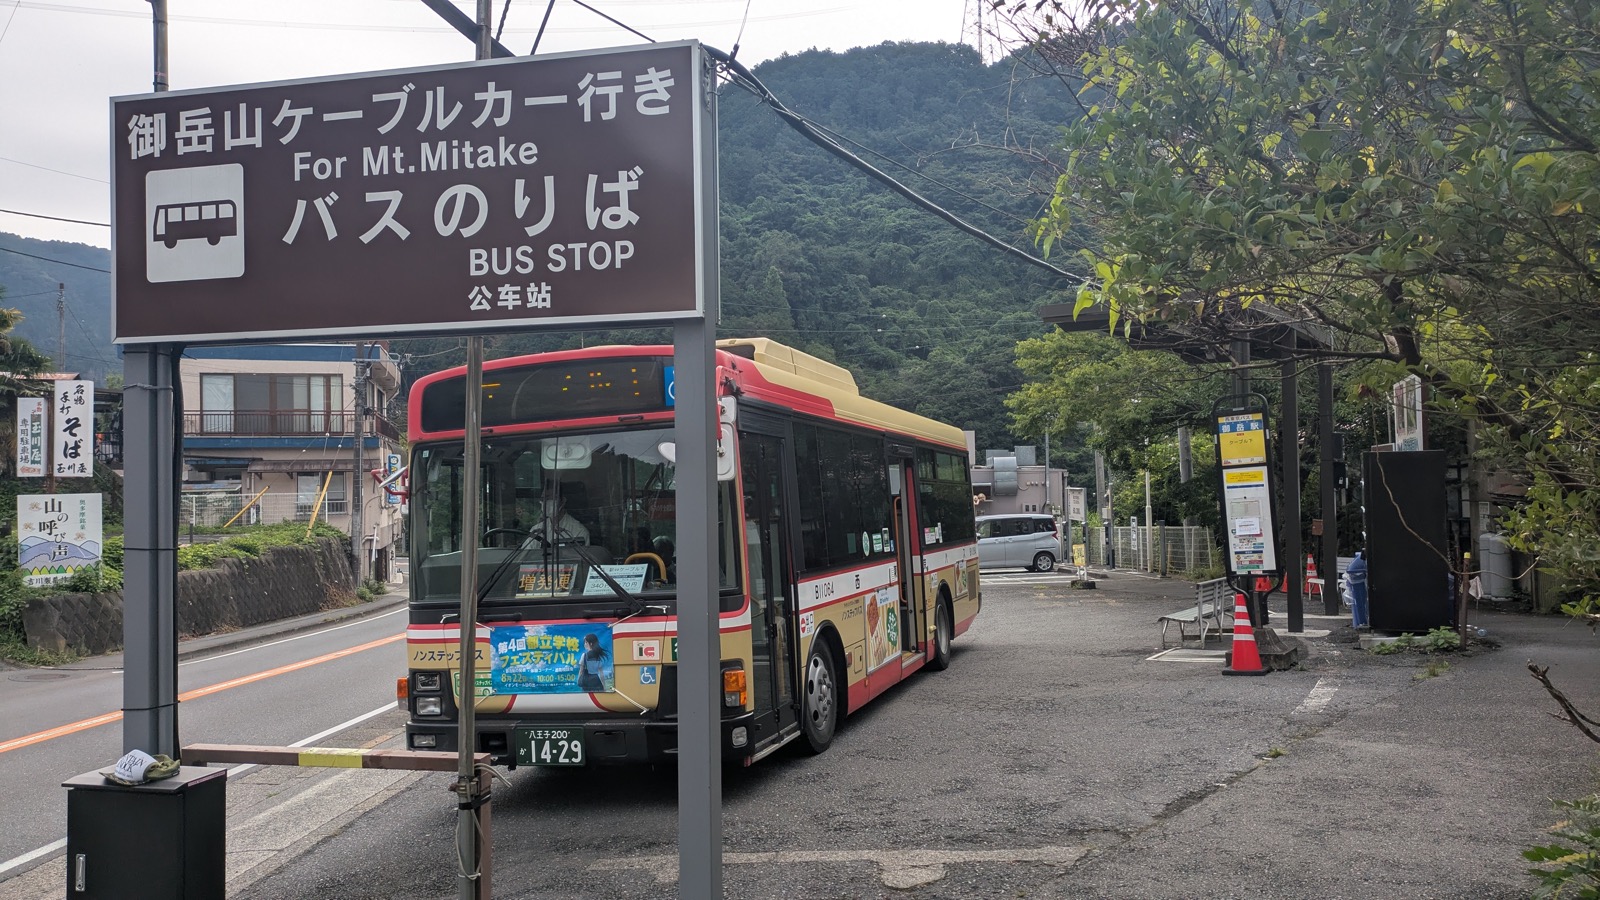
The bus stop is not always outside the station. At Mitake Station it is about 200 metres (220 yd) away, down the steps and along the road, which is far enough to make a first time visitor wonder whether they have gone the wrong way.
Three things make it easy.
The sign is often in English. The stop for Mount Mitake stands under a large brown board reading For Mt. Mitake / BUS STOP, above the Japanese. Somebody knew who would be standing there.
Almost everything from a trailhead stop goes to the same place. These are not city routes with a dozen services calling at the same pole. Check the destination on the front of the bus against the name at the top of the timetable, get on, and that is the end of the decision making.
Your stop is usually the last one. If the trailhead is the terminus, there is no way to miss it, no button to press, no announcement to understand. The driver stops, the doors open, and everybody gets out.
What is in English, and what is not
Worth knowing in advance, because it is consistent.
In English on the bus itself
- The word ENTRANCE under 入口 on the middle door
- The word EXIT under 出口 at the front
- A yellow label beside the entrance telling you to touch a card or take a ticket
- On the Mount Mitake route, a printed card beside the fare box giving the fare in English for adults and for children
Not in English
- The timetable on the pole
- The fare display at the front, apart from the numbers, which is all you need from it
- The stop request button
- The announcements
Put those two lists side by side and a pattern appears that holds across this whole part of Tokyo. The English is on the things you need at the moment you act. It is missing from the things you need in order to plan. The bus tells you which door to use, in your language, and then tells you nothing about when the last one leaves.
Which is why the useful half of this article is the half about timetables.
One way to skip the bus completely is a private Mitake day tour, which collects you from your hotel in Tokyo and drives you to the cable car by van. The cable car ticket is still paid by each guest at the station.
Affiliate link · Pickup inside the 23 wards · About 10 hours · Free cancellation up to 24 hours before
Does the mountain you picked need a bus at all?
Worth settling before anything else, because the bus is always the thinnest part of the day.
Open a map and look at where the trail actually starts, then at where the train actually stops. There are three cases in the mountains west of Tokyo, all three of which appear in this guide.
The trail starts at the station. Mount Takao is the clean example: the station and the trailhead are the same place, and no bus is involved in either direction. This is genuinely rare, it is a large part of why this mountain is as busy as it is, and it makes Takao the right first mountain for anybody who has not done this before.
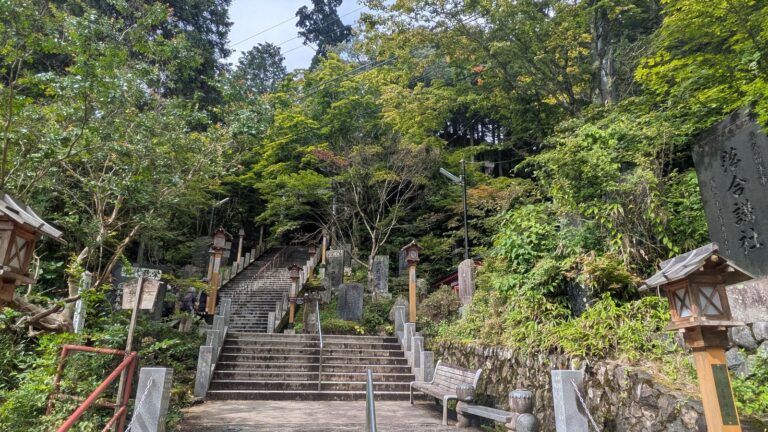
The station is in the valley, the trail is above it. Mount Mitake is this case. The train leaves you at 200 metres above sea level in a river valley, the walking starts several hundred metres higher, and the bus exists to close that gap. So does a cable car.
You walk out somewhere with no station at all. The best days often end this way, coming down a different side of the mountain into a village or at a hot spring, with a bus as the only way back to a railway. That is the case where the timetable matters most, because there is no walking alternative worth the name.
Then apply one rule. Check the last bus before you check the first train. Trains from the mountains run into the evening. The bus that connects to them may stop hours earlier, and it is the bus, not the train, that decides how long your day can be.
Questions people actually ask
How much cash should I carry for the bus?
Coins, plus one 1,000 yen note per bus journey. The fare box changes a 1,000 yen note but nothing larger. The two rides described here cost 340 yen each.
Is the IC card fare cheaper?
Not necessarily. In central Tokyo it is a few yen cheaper. On the bus to Mount Mitake the cash fare and the card fare are the same 340 yen. The card is worth carrying for the speed, not for the discount.
What if I only have a 10,000 yen note?
The fare box cannot change it. Buy something at a convenience store before you leave the city. If you are already on the bus, tell the driver at the start of the journey rather than at the end, so there is time to sort it out.
Do I need to tell the driver where I am going?
No. Take the ticket, or touch the card, sit down.
What if I press the button too late?
The bus stops at the next stop after the button is pressed, so press it as soon as the stop you want has been called. If your destination is the terminus you never need it.
Are the announcements in English?
There were no English announcements on either of the buses we rode. Stops are called in Japanese, and the destination shows on the display at the front. If you are going to the terminus, none of this matters.
What about a large backpack?
The bus we photographed was a low floor vehicle with room by the doors, which is common but not guaranteed. On a quiet weekday morning nobody minds a pack on the seat beside you. On a crowded bus, take it off your back and hold it low, which is the same courtesy as on a train.
Do children pay?
Half fare, rounded up to the nearest ten yen, on the routes here. The bus to Mount Mitake charges 340 yen for adults and 170 yen for children.
Can I take a dog?
Not with the dog walking on a lead. This is the one question in this article with a hard answer, and it surprises people, because Mount Mitake itself is unusually welcoming to dogs: the cable car sells pet tickets by weight, the shrine at the top has a water basin for them, the village is full of them.
The bus is where that stops. The operator carries only small pets inside a closed carrier, with the contents hidden from view, so a dog on a lead does not board. If you are hiking with a dog, the normal way up is to drive to the bottom cable car station at Takimoto, which has a paid car park charged by the hour with a daily maximum, then take the cable car with a pet ticket. Plan the day around a car rather than around the timetables in this article.
Will the bus be full?
The 07:56 to Mount Mitake on a Thursday in August was not. That is one bus on one weekday morning, so it is not a forecast. Weekend mornings during the autumn leaf season are the ones to arrive early for.
What if the bus is late?
Rural buses share the road with everyone else. The timetabled ten minutes from Mitake Station to the cable car took four on an empty road. Plan with the timetable, not with the best case.
Affiliate link. This site earns a commission if you book through it, at no extra cost to you. Photo from our own walk.
Related
- How to Get to Mount Mitake — the bus, the cable car, the one-way ticket, with the timetables for the route described here
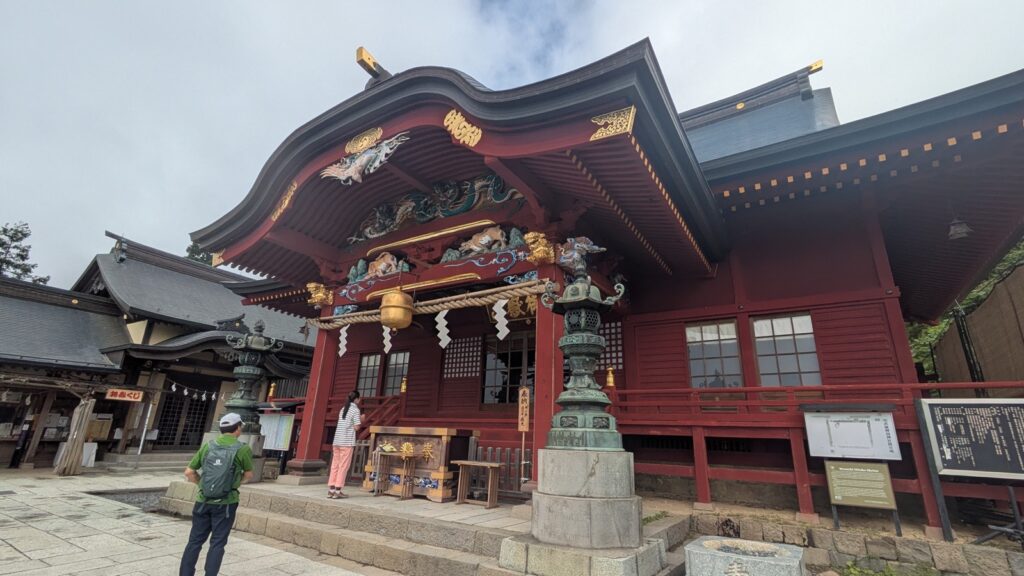
- Musashi Mitake Shrine: A Wolf Deity, Dogs at the Water Basin, and No Instructions Anywhere — where that bus takes you, a shrine to a wolf deity at the top of the cable car
- Mount Takao: Which Trail Should You Take? — the mountain where none of this is needed, which is why it is a good first one
- Mount Takao Cable Car or Chairlift? They Cost the Same — fares, timetables, the same kind of arithmetic
- Mount Mitake: The Hike You Decide After You Arrive — the mountain where the bus is only the first of three decisions
- Hakone Free Pass: Worth It for One Day? The 2026 Fares, Added Up Stop by Stop — where the rural bus rules meet a pass, with each fare in Hakone added up against it